Chapter 4: Electricity and Magnetism Experiments
The Oscilloscope
This orientation exercise will introduce you to some of the basic functions
of the cathode-ray oscilloscope. If you are already well experienced in
the use of an oscilloscope, then with the permission of your instructor
you may skip it.
Equipment
- Tektronix model 921 or Philips model 3050 oscilloscope
- sine/square signal generator
- 1.5 V dry cell
Basic Functions
 The oscilloscope
displays information by translating an input signal voltage into the position
at which an electron beam strikes a fluorescent screen. This is done by
deflecting the beam in an electric field which is proportional to the input
voltage. The idea is illustrated in Fig. 1. Each input signal (generally
time-dependent) is applied to a pair of deflection plates. An electron
passing between these plates is acted on by a force along the field direction,
and is deflected. Since, at any point on its trajectory, the force on the
electron is directly proportional to the applied potential difference,
the deflection of the beam is proportional to the input signal voltage
V.
In an oscilloscope, one set of plates produces a vertical deflection
of the electron beam, and another a horizontal deflection. The spot at
which the beam strikes the fluorescent screen therefore "maps"
the instantaneous values of the two input signals to a point on the screen.
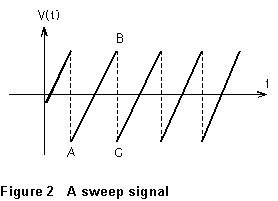 The most fundamental
mode of operation of the oscilloscope is to display the time dependence
of a single signal. In this mode, an internal circuit generates a signal,
something like that shown in Fig. 2, which is applied to the X (horizontal)
input. This signal voltage increases linearly with time over a fixed interval
(A to B), after which it resets very quickly (B to C) to its initial value,
and repeats. The spot at which the electron beam hits the screen thus sweeps
at a uniform speed across the screen, resets, and sweeps across again and
again. The oscilloscope display thus becomes a graph whose horizontal axis
corresponds to time, and whose vertical axis to the voltage applied at
the Y input. If the input signal is periodic, moreover, the repetition
rate of the sweep can be synchronized with it, so that the identical display
is traced out over and over.
Procedure -- Philips M/3050 Oscilloscope
NOTE: A diagram of the oscilloscope front panel controls
appears below. The reference numbers on the connectors and controls in
Fig. 3 do not appear on the actual instrument!
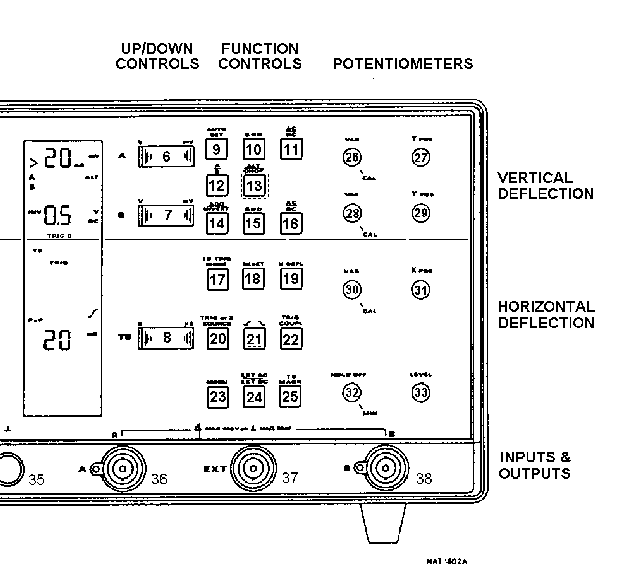
(1) Connect the oscilloscope to the AC line. Push in the POWER
switch so that it stays in the IN position.
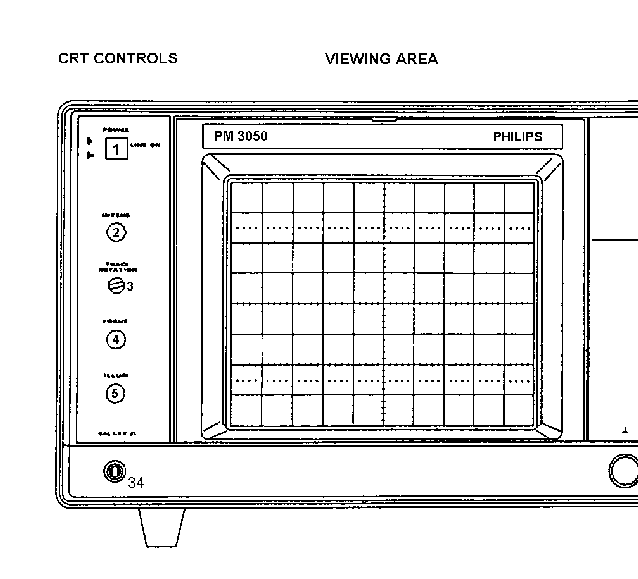
(2) The display tube (CRT) controls -- INTENSITY and FOCUS, etc.
-- are in the cluster at the far left of the instrument face. The oscilloscope
will come on in a sweep mode (1 ms/cm), so you will see a horizontal line
across the screen. Change to the x-y deflection mode by pushing the X DEFL
switch (19). You should now see a bright spot near the center of the screen
-- the position of the undeflected electron beam.
What are the effects of the INTENSITY (2) and FOCUS (4) controls on
the beam spot? Set these so that the spot is sharply focused and just
bright enough to see clearly.

(3) What are the effects of the X POS (34) and Y POS (27) controls?
Use them to position the beam spot at the center of the screen. Note that
there are two vertical deflection channels, A and B. As they are
identical, only the A controls are described. The oscilloscope works by
applying voltages to the X and Y deflection plates, causing deflections
of the spot on the screen. In the following, we connect the vertical deflection
to the A input (36), and the horizontal deflection to the B input (36).
(4) Make sure that the VAR controls (26, 28) are set to the full
clockwise (CAL) setting. Use the VOLTS/CM controls (6, 7) to set the vertical
deflection sensitivity on both channels A and B to 0.5 V/cm. Pushing the
left-hand side of this switch decreases the sensitivity, the right-hand
side increases it. The setting is shown on the LCD readout panel just to
the left of the switch. Use the AC/DC input switches (11, 16) to set the
input modes to DC. Re-center the beam spot if necessary. Now use the A/B
(12) switch to set the Y-deflection source to A, and use the TRIG or X
SOURCE (17) switch to set the X-deflection source to B.
(5) Now connect a dry cell to input A (36), using a coaxial cable.
(The outer shield of the cable connector is automatically connected to
ground at the oscilloscope input connector, and a separate ground connection
is not necessary.)
(6) When you made the connection, what did the beam spot do?
The battery voltage is around 1.5 V, and you've set the oscilloscope to
translate each volt at the Y input into 0.5 cm vertical deflection. How
far did the beam spot move? Repeat with the sensitivity setting at 1 V/cm,
and again with it as 2 V/cm, and record your results.
(7) Interchange the connections at the battery terminals, and
repeat step (5). What difference did this make?
(8) Move the battery connection from the A to the B (X-deflection)
input. Repeat steps (6) and (7).
(9) Try the same thing (one sensitivity setting is enough) with
both X and Y deflection connected to the A input, and explain what
happens.
(10) Disconnect the battery. Push the X DEFL switch (19) to toggle
back to sweep mode, set the TRIG or X SOURCE (20) switch to A and the TB
TRIG MODE (17) switch to AUTO. Adjust the sweep rate to 0.5 (sec/cm) using
control 8. You should see the beam spot sweeping horizontally across the
screen; if not, adjust the INTENSITY control until it is visible. Notice
that the spot moves horizontally from left to right at a constant speed,
then reappears at the left, pretty much instantaneously, and starts again
(see Figure 2).
(11) Adjust the POS controls so that the starting point is (-5
cm, 0). Use your watch to determine the time it takes for the spot to travel
10 cm horizontally, and record the result. Does it agree with the switch
setting of 0.5 sec/cm? Repeat this determination with the sweep rate set
at 0.2 sec/cm. What is the effect of varying the horizontal VAR control
(30) on the rate at which the spot sweeps across the screen? With this
control set fully counterclockwise, change the sweep rate control to 1
m (sec/cm). You can see the path of the spot across the screen, but you
can no longer observe it moving. Why not?
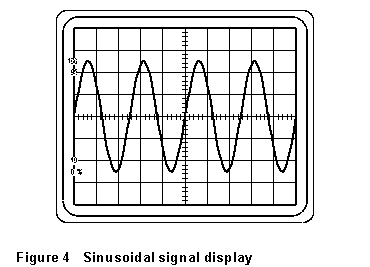 (12)
Now set the VOLTS/CM control to 2 V/cm and the SEC/DIV switch to 2 msec/cm.
Set the TB TRIG MODE (17) switch to TRIG, the triggering slope switch (21)
for positive slope, and the triggering LEVEL (33) control at or just above
the middle of its range. Turn on the signal generator, set its frequency
to 1 kHz, sine wave output, and the amplitude control to about the "1
o'clock" position. Connect a coaxial cable from the HI output of the
signal generator to the A input of the oscilloscope. You should see a sinusoidal
waveform, looking something like Fig. 4, displayed on the screen; if not,
small adjustments of the LEVEL control should bring it in. If you have
trouble with this, call your instructor.
(13) Change the sweep rate switch setting (8); what effect does
this have on the pattern? Can you restore its original appearance by changing
the signal generator frequency? Continue making such changes until the
relation between signal frequency, sweep rate, and display scale is clear
to you, and record your conclusions. In the same way, observe and record
the relation between signal amplitude, volts/cm setting, and the vertical
scale of the display.
(14) Reset everything as for (12) above. Vary the triggering
LEVEL control. What happens to the display? What do you think this control
does?
(15) Make changes in the V/cm, msec/cm, etc., controls until
the display is very different from Figure 3 -- much too small, much too
large, whatever. Now push AUTO SET (9). What happened? This is one of the
nicer features of this oscilloscope model.
Procedure -- Tektronix Model T921 15 MHz Oscilloscope
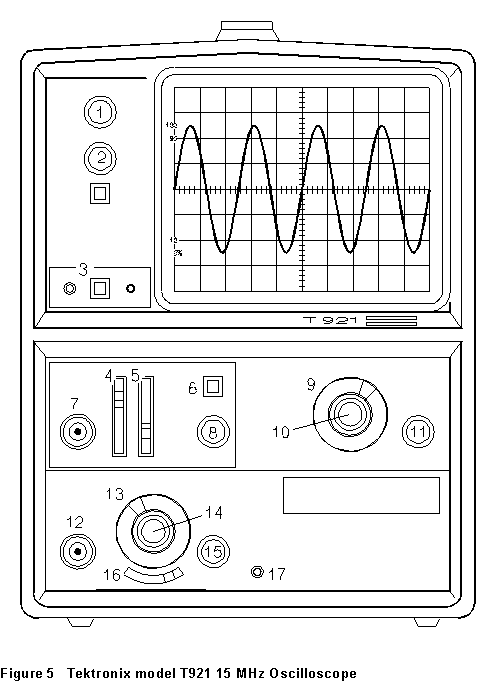
(1) Connect the oscilloscope to the AC line. Push in the POWER
switch (3) so that it stays in the IN position.
(2) Set the INTENSITY (1) and FOCUS (2) controls (top left of
scope face) at about mid-range, and the TRIGGERING SOURCE (4) switch to
X-Y. After a few seconds a small spot should appear on the screen. What
are the effects of the INTENSITY and FOCUS controls? Set these so that
the spot is sharply focused and just bright enough to see clearly.

(3) What is the effect of the X (11) and Y (15) POSITION controls?
Use them to place the spot at the center of the screen.
(4) Set the VOLTS/DIV switch (13) to the 0.5 (volt/cm) position.
The setting of this switch is read in the X1 PROBE window. Rotate the red
VAR (14) control to its maximum clockwise position. Set the INPUT MODE
switch (16) to DC. Re-center the spot if necessary.
(5) Connect a dry cell to the oscilloscope Y input (12). (When
a coaxial -- shielded -- cable is used, the outer shield of the cable connector
is automatically connected to ground at the oscilloscope input, so a separate
ground connection is unnecessary.) When you make the connection, what does
the beam spot do? The battery voltage is around 1.5 V, and you've set the
oscilloscope to translate each 0.5 V at the Y input into 1 cm vertical
deflection. How far did the beam spot move? Repeat with the VOLTS/DIV switch
at 1 V/cm, and again with it as 2 V/cm, and record your results.
(6) Interchange the connections at the battery terminals, and
repeat step (5). What difference did this make?
(7) Disconnect the Y input, and use the X and Y position controls
to reposition the spot at (-5 cm, 0). Set the red X1-X10 control (10) in
its extreme counterclockwise position (X1). Connect the dry cell to the
X input (7). Note the deflection of the spot. Now remove the lead from
the X-input, turn the X1-X10 control about 1/4 turn clockwise, reposition
the spot at (-5 cm, 0). Now reconnect the X-input lead, and note the deflection
of the spot. What is different? Continue in this way, changing the X1-X10
control, until you can explain clearly what this control does. Record your
conclusions.
(8) Disconnect the X input. Set the TRIGGERING SOURCE (4) switch
to INT and the TRIGGERING MODE (5) switch to AUTO. Set the SEC/DIV switch
(9) to 0.5 (sec/cm) and the X1-X10 control (10) fully counterclockwise.
You should see the beam spot sweeping horizontally across the screen; if
not, adjust the INTENSITY control until it is visible. Notice that the
spot moves horizontally from left to right at a constant speed, then reappears
more or less instantaneously at the left, and starts again; compare Figure
2.
(9) Adjust the POSITION controls (11), (15) so that the starting
point is (-5 cm, 0). Use your watch to determine the time it takes for
the spot to travel 10 cm horizontally, and record the result. Does it agree
with the switch setting of 0.5 sec/cm? Repeat this determination with the
SEC/DIV switch set at 0.2 sec/cm. Keep trying different settings of this
switch until you can explain clearly what it does. Record your conclusions.
Also determine what effect varying the X1-X10 control has on the rate at
which the spot sweeps across the screen.
With the X1-X10 control set fully counterclockwise, turn the SEC/DIV
switch to 1 m(sec/cm). You can see the path of the spot across the screen,
but you can no longer observe it moving. Why not?
(10) Now set the VOLTS/DIV switch to 2 V/cm and the SEC/DIV switch
to 2 msec/cm. Set the TRIGGERING MODE switch to NORM, the SLOPE switch
(6) out (+), and the LEVEL control (8) at or just above the middle of its
range. Turn on the signal generator; set its frequency to 1 x 1 Khz, the
shape control to the sine wave, and the amplitude control to about "1
o'clock" position. Connect a coaxial cable from the HI output of the
Wavetek to the Y-input of the oscilloscope. You should see a sinusoidal
waveform displayed on the screen, looking something like Fig. 5. If you
do not, small adjustments of the signal display and TRIGGERING LEVEL controls
should bring it in.
Change the SEC/DIV switch setting; what effect does this have on the
pattern? Can you restore its original appearance by changing the signal
generator frequency? Continue making such changes until the relation between
signal frequency, sweep rate, and display scale is clear to you, and record
your conclusions.
In the same way, observe and record the relation between signal amplitude,
VOLTS/DIV setting, and the scale of the display.
DC Circuits -- Ohm's and Kirchhoff's
Laws
last updated 6/96
 The oscilloscope
displays information by translating an input signal voltage into the position
at which an electron beam strikes a fluorescent screen. This is done by
deflecting the beam in an electric field which is proportional to the input
voltage. The idea is illustrated in Fig. 1. Each input signal (generally
time-dependent) is applied to a pair of deflection plates. An electron
passing between these plates is acted on by a force along the field direction,
and is deflected. Since, at any point on its trajectory, the force on the
electron is directly proportional to the applied potential difference,
the deflection of the beam is proportional to the input signal voltage
V.
 The most fundamental
mode of operation of the oscilloscope is to display the time dependence
of a single signal. In this mode, an internal circuit generates a signal,
something like that shown in Fig. 2, which is applied to the X (horizontal)
input. This signal voltage increases linearly with time over a fixed interval
(A to B), after which it resets very quickly (B to C) to its initial value,
and repeats. The spot at which the electron beam hits the screen thus sweeps
at a uniform speed across the screen, resets, and sweeps across again and
again. The oscilloscope display thus becomes a graph whose horizontal axis
corresponds to time, and whose vertical axis to the voltage applied at
the Y input. If the input signal is periodic, moreover, the repetition
rate of the sweep can be synchronized with it, so that the identical display
is traced out over and over.


 (12)
Now set the VOLTS/CM control to 2 V/cm and the SEC/DIV switch to 2 msec/cm.
Set the TB TRIG MODE (17) switch to TRIG, the triggering slope switch (21)
for positive slope, and the triggering LEVEL (33) control at or just above
the middle of its range. Turn on the signal generator, set its frequency
to 1 kHz, sine wave output, and the amplitude control to about the "1
o'clock" position. Connect a coaxial cable from the HI output of the
signal generator to the A input of the oscilloscope. You should see a sinusoidal
waveform, looking something like Fig. 4, displayed on the screen; if not,
small adjustments of the LEVEL control should bring it in. If you have
trouble with this, call your instructor.
