ROS Hydro CSSE 290 Tutorials
Prerequisites:
- Ubuntu 12.04.3 installed as a dual-boot system
- ROS Hydro
- Wired internet connection
If anything isn’t working for you, or is behaving strangely, you can send an email to me, Tayler Burns (burnstt@rose-hulman.edu) or Derek Heger (heegerds@rose-hulman.edu). You can also talk to one of us in person.
Creating a ROS Workspace
First, we have to create a catkin workspace. This is where we will do our development and testing for all things ROS.
- First we have to open a Terminal window. You can do this with the keyboard shortcut Ctrl + Alt + T
- For much more information about the Terminal, you can refer to the Ubuntu help page for Using the Terminal
- You should see a window similar to the one below

- Copy and Paste the following into the terminal. You will probably have to use Shift + Insert to paste into the terminal. Make sure to press enter after each time you paste something.
mkdir -p ~/ros_workspace/src |
The first of these steps makes a new folder where we will be doing our work. The second, changes our directory to the folder that we just created. The last command sets up all the things that we need in order to compile our code and to connect it with ROS.
- Copy and Paste the following into the terminal. Make sure to press enter after each time you paste something.
The first command changes the current directory to our ROS workspace. The second command is what you will use to build a package for ROS. In this case, it creates the setup.bash file that we need for the last command. The last command tells our Terminal to take the setup.bash file located in the “devel” folder and to execute what it contains.
- At this point you have sucessfully set up a ROS catkin workspace. This enables you to develop and run your own custom packages for ROS. A package contains code that allows it to do things, like read a sensor or decide where to move the robot. Often times a package will need another package to handle additional things, like talking with the GPS unit. Thats where catkin comes in. It connects packages together and makes sure that they can work together.
Creating your first ROS package
Now, we will create a new ROS package.
- Copy and Paste the following into the terminal. This will change our current directory to our ros_workspace. It is in this folder that we will create our new package.
- Paste the following code into the terminal. This one line of code will take care of creating our brand new ROS package. The first part is the command that we are running, catkin_create_pkg. Following this are its arguments. The first argument, ros_tutorials, tells catkin_create_pkg what we want to call our new package; its name. After that are the dependencies for our package. I.E. std_msgs, rospy and roscpp. We are saying that in order for our package to function we need to have these other packages installed.
catkin_create_pkg ros_tutorials std_msgs rospy roscpp |
- Run the following code in the terminal. Just like before, this code will change our current directory to the directory that contains our ros_tutorials package.
cd ~/ros_workspace/src/ros_tutorials/ |
- Go ahead and run the code below in the terminal. It should open a text editor and display the contents of package.xml. As long as the text editor is open, you cannot use that terminal. The reason is that to the terminal, the text editor just looks like a normal command. And while we are using the editor that command continues to run. As a result, the instant you close the text editor, the terminal will return to waiting for you to tell it to do something. ROS is very similar, except that it doesn’t display a nice GUI while it is running.
- You can also stop a command that is running in the terminal by pressing Ctrl + C. This should stop whatever is running in its tracks.

- We will now update this file so that it actually represents our package. When we ran catkin_create_package it only created a skeleton for our package. Its up to us to fill it in and make it work.
- As you can see at the top, this document is laid out in a special format called xml. XML is made of tags, E.G. <name> or <version>. Tags are a way of saying what data is stored there, and in order to know where the data stops we have to have a closing tag E.G. </name> or </version>. Tags must have a matching closing tag before the end of the file.
- The things that look kind of like tags <!-- and -->, are comments. You should remove them before you are done with the file.
- The first tag that we will fix is the description tag. Change it so that line says:
<description>A package to learn how to use ROS</description> |
- After that, update the maintainer tag with your information. It is required to have at least one maintainer, but you can add many if you like.
- Next, go ahead and update the license tag. I chose to use the BSD license, but it doesn’t matter that much for the tutorial.[a]
- The last thing that we have to do is update the dependencies part of the file. This is what tells ROS and catkin the things that our package needs to run. For more information. In our case, this has been taken care of. But, if you are working on a package and realize you need a dependency that you didn't know about when you created the package, this is where you would add it.
- Below is my final package.xml, with the comments removed for readability. The export section can be removed it desired.

- Go ahead and save the package with Ctrl + S. Afterwards, close out of the text editor and control of your terminal will return.
Building a ROS package
We will now actually build the new package that you created in the previous section
- Run the following in the terminal. This puts us in our ROS workspace.
- Run the following command. This is the general flow behind building a package for ROS. First you create a package. Then you edit the files inside of the package. Lastly you run catkin_make, this compiles all packages that we have in our ROS workspace. Its output should look similar to what is shown below.

- Once that has finished running, Go ahead and run ls, this shows us what files and directories exist inside of the directory we are currently inside of.

- At this point you have successfully created and built a package in ROS. However, we still have to make it do something.
What is a ROS node?
A ROS node really isn't much more than an executable file within a ROS package. ROS nodes use a ROS client library to communicate with other nodes. Nodes can also publish or subscribe to a Topic. Nodes can also provide or use a Service.
The ROS client libraries allow nodes written in different programming languages to communicate:
- rospy = python client library
- roscpp = c++ client library
Topics are like pipes. They allow nodes to send and receive messages. Topics are unidirectional, however. A node publishes messages. It doesn’t care who is listening for them, it will publish the messages regardless. Another node will then subscribe that topic. And all of the messages that are published by the first node get sent to the second node.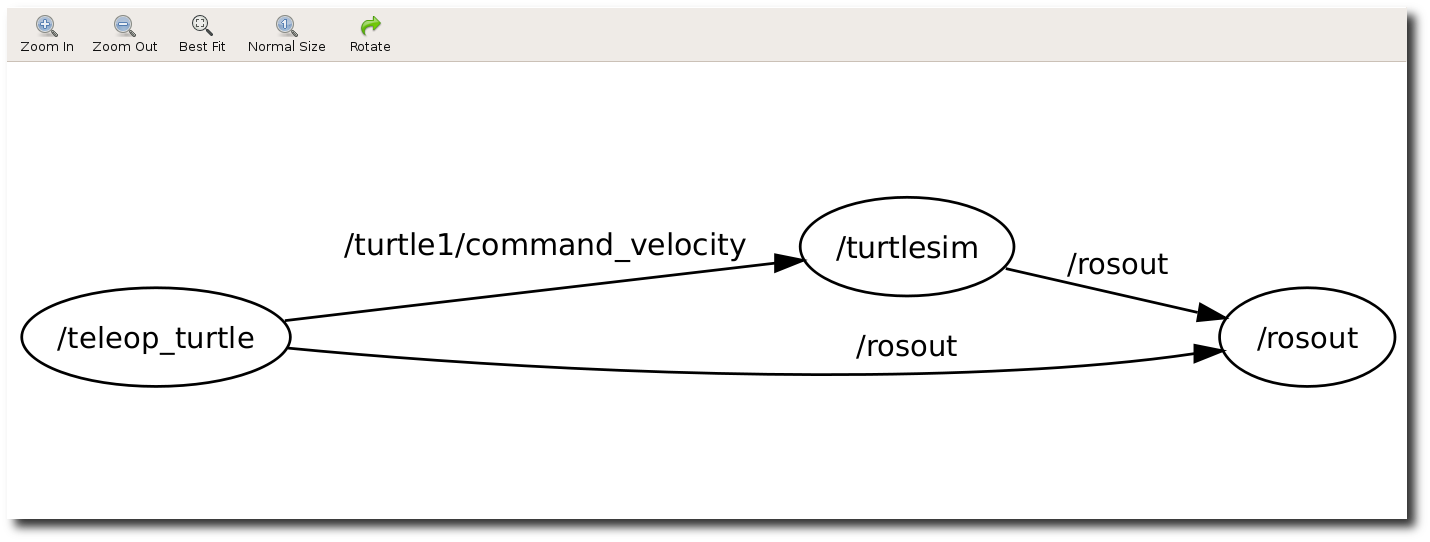
In the example above, the node /teleop_turtle is publishing /turtle1/command_velocity. Which is being subscribed to by the /turtlesim node. Both /turtlesim and /teleop_turtle are publishing topics called /rosout. The /rosout topic is then being subscribed to be the node named /rosout. For more information check out the ROS page on the subject.
Writing a Publisher and Subscriber in C++
[a]Tayler Burns:
We should choose one for the course