 In this experiment
you will use a prism spectrometer to measure the index of refraction
of a glass prism as a function of the wavelength of light. The geometry
of the prism spectra-meter to be used is shown in Figure 1.
In this experiment
you will use a prism spectrometer to measure the index of refraction
of a glass prism as a function of the wavelength of light. The geometry
of the prism spectra-meter to be used is shown in Figure 1.| Table of Contents |
Crummett and Western, Physics: Models and Applications,
Sec. 36-1,4
Halliday, Resnick, and Walker, Fundamentals of Physics (5th
ed.), Sec. 34-7,8
Tipler, Physics for Scientists and Engineers (3rd ed.), Sec.
30-4
 In this experiment
you will use a prism spectrometer to measure the index of refraction
of a glass prism as a function of the wavelength of light. The geometry
of the prism spectra-meter to be used is shown in Figure 1.
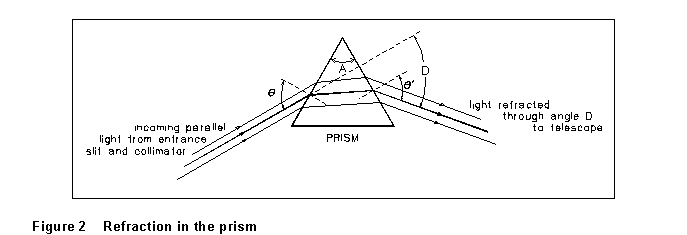
Light from a source S is passed through a collimator, in which
the light rays are refracted parallel to the axis, and strikes a glass
prism. It is refracted at each of the prism surfaces, and enters a telescope
through which the refracted light can be viewed. The total angle through
which light has been deflected is D in Figure 2. This angle D
will depend on the angle of incidence at which light strikes the prism
![]() , the prism's apex
angle (A), and the wavelength of the light.
, the prism's apex
angle (A), and the wavelength of the light.

If the prism is rotated so as to change angle ![]() ,
deflection angle D will also change. For a given wavelength of light,
there is some particular orientation of the prism for which D has
a minimum value. From the laws of refraction, one can show that
this angle of minimum deviation (Dmin) and the
index of refraction of the prism (n) are related by
,
deflection angle D will also change. For a given wavelength of light,
there is some particular orientation of the prism for which D has
a minimum value. From the laws of refraction, one can show that
this angle of minimum deviation (Dmin) and the
index of refraction of the prism (n) are related by
 (1)
(1)
All this assumes that the light from the source is monochromatic, that is, all of the same frequency and wavelength; because, in general, the index of refraction of the prism will be different for each different wavelength of light. When you look through the telescope at light that is not monochromatic, therefore, you will see a separate image of the collimator entrance slit in light of each wavelength. (Each image is a vertical line, so one speaks of light containing different discrete wavelengths of light as producing a "line spectrum.") In this case, the angle of minimum deviation must be located separately for each line in the spectrum. Measuring Dmin and using (1) then gives the index of refraction for light of that particular wavelength. A graph showing the relationship of n and is called the dispersion curve for the material of which the prism is made.
The spectrometer is a frame (see Figure 1) upon which the collimator, prism support, and telescope are mounted in such a way as to allow them to rotate separately around a common axis. An angle scale is provided which allows measurement of the angular position of the telescope to within one minute of arc. The spectrometers should already have been aligned before you use them, so that the objective lens of the telescope brings the parallel light from the collimator into focus exactly in the plane of the cross hairs, and so that telescope, collimator, and prism table are all rotating about the same axis.

A large thumbscrew near the axis of the instrument, about an inch above scale level, clamps the telescope. Large adjustments of the telescope position are made by releasing this screw. A second large thumbscrew at the same height, at the base of the telescope, provides fine adjustment of the telescope position. The prism table assembly rides on a collar which is clamped in place by a smaller thumbscrew, fixing its height. The table is clamped against rotation by another screw about 4 cm below the prism table; loosening this screw allows the prism table to rotate about the spectrometer axis.
At the source end of the collimator, there is a small thumbscrew which adjusts the width of the entrance slit. This lets you use a wide slit, admitting lots of light, to find your way around; and then narrow the slit for precise angle measurements. This, and the four thumbscrews mentioned in the last paragraph, are the only adjustments you should have to make on the spectrometer.
The angular position of the telescope is read on a circular scale fastened
to the base of the instrument. Main scale divisions are 0.5 degrees apart,
and they are subdivided by a 30-part vernier scale (see Sec. 1-2), so you
can read the scale to one minute of arc. For example, if the index falls
between 153.5 degrees and 154 degrees on the main scale, and the 19th vernier-scale
mark lines up, the angle reading is ![]() .
You may occasionally want to read the scale to half a minute of arc, if
two adjacent vernier-scale marks seem equally well aligned. Note that the
angle that the scale reads is not D (in Figure 2), but approximately
.
You may occasionally want to read the scale to half a minute of arc, if
two adjacent vernier-scale marks seem equally well aligned. Note that the
angle that the scale reads is not D (in Figure 2), but approximately
![]() .
.
(1) Look into the telescope and adjust the eyepiece until the cross-hairs are distinctly seen.

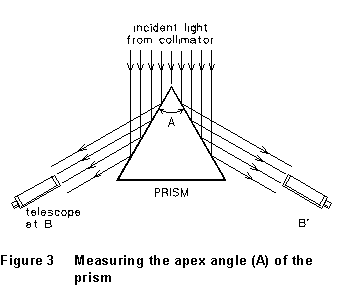
(2) Loosen the screw that clamps the prism table, and rotate the prism table until the apex of the prism points directly at the collimator. Re-tighten the screw. Illuminate the slit using the white (incandescent) bulb in your multiple light source, and rotate the telescope until the image of the slit, reflected from the side of the prism, can be seen. (This is position B in Figure 3). If you can't find the image, get your instructor to help you. Don't adjust the prism alignment your-self. Clamp the telescope position, and use the fine-adjustment screw to set the image of the slit exactly on the cross hairs. Read and record the angular position of the telescope. Unclamp the telescope and rotate it to position B'; re-clamp it and use the fine-adjustment screw to set the cross-hairs on this image of the slit, and read and record the telescope angle. The angle through which the telescope has been rotated between B and B' is twice the apex angle (A) of your prism; you should prove this in your write-up.
Since deciding when the cross hairs are exactly aligned with the image is a matter of some judgement, it would be wise to repeat these determinations several times. This will also give you some sense of how precisely you can locate an image.
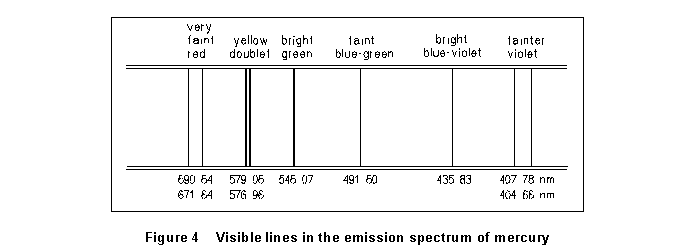
(3) Loosen the prism table and turn it until the prism is oriented as indicated in Figure 2. Position the mercury vapor lamp (blue) to illuminate the slit of the collimator. With the telescope in approximately the position of Figure 2, look through it and adjust its position, or the orientation of the prism table, until you see a number of colored lines. They will be spaced roughly as in Figure 4, although you won't be able to see them all in the telescope field at any one position.

(4) Focus your attention on the outer yellow line (579.06 nm). Keeping this line in the telescope's field of view, rotate the prism table in the direction that decreases the deviation angle (D) of this line. Set the prism table and clamp it in the position for which the deviation angle is a minimum. Clamp the prism table in this position, and carefully adjust the telescope position until the cross-hairs coincide with this line. Read and record the position. Unclamp the prism table, rotate it out of position, and have your partner repeat the measurement.
(5) Repeat step (4) for each of the lines visible in the Hg spectrum. Depending on your eyes and your equipment, the violet line at 407.78 nm, and either or both of the red lines, may or may not be visible. For each determination of an angle of minimum deviation, the prism table is unclamped and rotated until minimum deviation is observed. Two independent determinations are made for each line in the spectrum.
(6) Set up the small white light source at the slit. Observe and describe the appearance of the spectrum produced by this source.
(7) Carefully remove the prism from the support table and set it aside, somewhere where it won't get knocked off the lab bench. Swing the telescope around until the light coming directly from the collimator is observed. Set the telescope so that this image of the slit falls on the cross hairs, and record the reading on the angle scale. Repeat this measurement several times.
For each line, the angle of minimum deviation, Dmin, is the difference between the minimum-deviation scale reading you recorded in step (4) and (5), and the straight ahead scale reading you measured in step (7).
(1) Make a table showing, for each wavelength, your individual values of Dmin, their average, and the corresponding value of n calculated from Equation (1). The calculation of n should be carried out to at least four decimal places. Pick one typical wavelength and carry out a calculation of the standard error in n, using the error-propagation methods of Sec. 2.5. REMEMBER THAT ANGLES IN THIS KIND OF CALCULATION MUST BE EXPRESSED IN RADIAN MEASURE.
(2) Draw a graph of n vs. ![]() for all the lines of the Hg spectrum that you measured. This is called
the dispersion curve of the glass of which your prism is made. From your
dispersion curve, estimate as closely as possible the index of refraction
of the glass at a wavelength of 589.0 nm. The Handbook of Chemistry
and Physics gives the following values of n at this wavelength,
for some different kinds of glass:
for all the lines of the Hg spectrum that you measured. This is called
the dispersion curve of the glass of which your prism is made. From your
dispersion curve, estimate as closely as possible the index of refraction
of the glass at a wavelength of 589.0 nm. The Handbook of Chemistry
and Physics gives the following values of n at this wavelength,
for some different kinds of glass:
| zinc crown glass | 1.517 |
| higher-dispersion crown | 1.520 |
| light flint | 1.575 |
| dense flint | 1.650 |
| densest flint glass | 1.890 |
Can you draw any conclusions about the type of glass of which your prism is made? Note that your conclusions will depend on the experimental error in your values for n.
(3) The dispersion curve of glass should be pretty well approximated by the formula
![]() (2)
(2)
where b and d are constants. If this is the case, a graph
of n vs. ![]() should be a straight line; see Sec. 2.5. Draw this graph. Do your data
support the prediction that n vs.
should be a straight line; see Sec. 2.5. Draw this graph. Do your data
support the prediction that n vs. ![]() is linear? Use a least-squares fit to determine values for b and
d.
is linear? Use a least-squares fit to determine values for b and
d.
Chapter 5 -- Waves Experiments -- Prism Spectrometer -- Dispersion Curve for Glass (Version 2)
last update 6/96