Lens, Tiny Bulbs and Cloth Give the Wavelength of
Light
Michael J. Moloney
Rose-Hulman Institute of Technology
(This talk is an adaptation and refinement of 'Homemade
Interference', TPT November 1999 by the same author).
-
An ordinary cloth sample can act like a grating.
-
When one looks through the cloth next to one's eye, a tiny
light source shows a rectangular array of bright dots surrounding the source.
These are due to the orders of interference from the grating.
-
The angle between the dots is the classic [ d sin theta =
wavelength ] for a grating
-
In this experiment d is measured by projecting image of the
grating onto a whiteboard using a lens.
-
Students looking through the cloth at a pair of tiny lighted
christmas tree bulbs on the floor can determine the wavelength of light
to 10-15%. by measurements which give the angle theta.
-
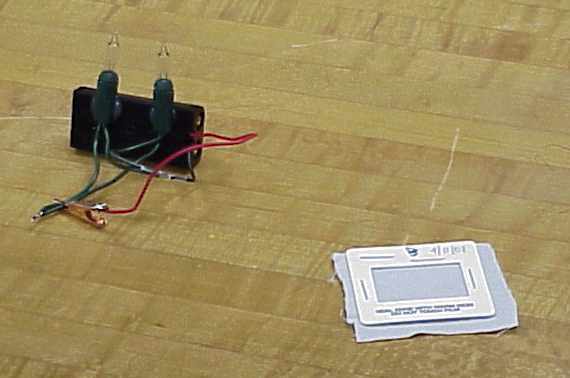
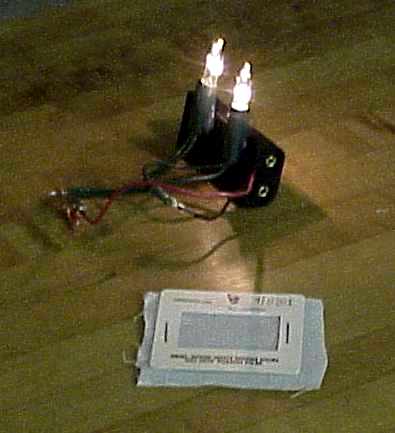
The cloth is most conveniently mounted in a 'ready mount'
and the bulbs are hot-glued to a battery holder, as shown in Figs 1. and
2.
-
We learned today from one of the workshop participants
(APS, Indianpolis, March 19, 2002) that bedsheets are sold (always?) telling
how many threads per inch were used in the construction!! Wow, one
would not necessarily have to do a separate experiment to determine the
the spacing d between adjacent fibers.

Figure 1. Two light bulbs hot-glued to a battery case
with a pair of 1.5-v bulbs installed. A cloth sample has been stapled into
a ready-mount.

Fig. 2. The light bulbs lighted, and a cloth sample stapled
into a ready-mount.

Fig 2' . Suggestions for constructing the cloth grating
mount.

Fig. 3. Determining the cloth spacing using a lens (done
ahead of the class experiment).
-
On April 30, 2001, 46 students in two classes at Rose-Hulman
individually took measurements enabling them to calculate the wavelength
of light.
-
The cloth spacing had been measured by two students ahead
of time, and I measured it too. This was done with a lens of about 6 cm
focal length. A small flashlight illuminated the cloth sample and the lens
was used to project the image of the cloth on a whiteboard about 1.7 m
away. Knowing that the magnification is -i/o, one could measure the spacing
on paper taped to the whiteboard, then calculate back to the distance between
fibers. The two students got 0.27 mm, and 0.275 mm, while I got 0.26 mm,
so we had the class use a value of 0.27 mm.
-
I had also determined the spacing between the bulb filaments
ahead of time. For one pair this was 26.5 mm and for the other it was 21.0
mm. I did this with a plastic ruler, to about half a mm.
-
Two pairs of bulbs were used and placed on the floor of the
laboratory.
-
Four students could be measuring at the same time, two for
each pair of bulbs.
-
A student would begin by standing either 9 or 10 feet from
a pair of bulbs, in line with the bulbs.
-
A very short student might stand only 7 or 8 feed away, so
one bulb would not obstruct the view of the other bulb, looking down on
them on the floor.
-
First the student held the cloth grating next to his or her
eye and lined up the dot pattern from the two bulbs, moving laterally if
necessary line up with the bulbs.
-
Then the student moved laterally until the dot pattern of
the farther bulb had been shifted over by one 'dot' with respect to the
dot pattern of the closer bulb.
-
The distance moved laterally could then be used to calculate
the angle moved in order to shift the interference pattern of one bulb
with respect to the other bulb by one 'dot'. This was done with a meter
stick, but could have been done using only the floor tiles, which are 1
foot on a side.
-
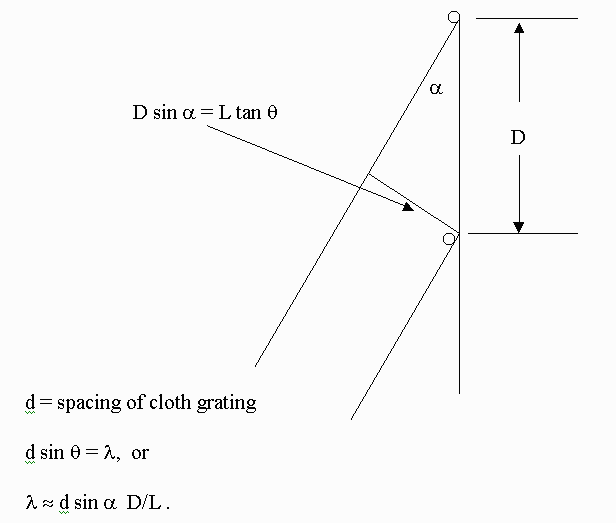
This, coupled with the other information permitted each student
to calculate an average wavelength of light using the math given in Figure
3, and the relation d sin theta = wavelength. [d is the spacing of fibers
in the cloth.]

Figure 3. Geometry for calculating the wavelength of light
from simple measurements. A student starts by lining up with the bulbs,
then moves to his or her left until the pattern of 'dots' is shifted over
by one. The light wavelength is d sin theta, where d is the cloth grating
spacing.

Figure 4. Details of wavelength calculation.
Some candid pictures of
students measuring in the lab.
The student results for the wavelength of light.
-
The overall average was around 570 nm, extremely close to
the 'true' average wavelength
-
However, the results were widely scattered; they went as
low as 300 nm and as high as 900 nm.
-
I estimate that a good 20% of students did not see the phenomenon,
and were forced to guess.
-
I did not make it clear to everyone that the dot pattern
would not be identical to the original alignment. Rather the top set of
dots would be shifted by one dot compared to the lower set of dots. The
upper set of dots is from the farther bulb and the nearer set of dots is
due to the closer bulb.
Conclusions
-
1/2 a class period is too short to have 20+ students all
see the desired effect and make an accurate measurement
-
The advance preparation was good
-
'Training' 2 or so volunteers per class to help
-
Measuring the cloth spacing ahead of time using a simple
lens of about 5 cm focal length.
-
Measuring the bulb filament separation ahead of time.
-
This might work well as a class project
-
Some students measure the cloth spacing
-
Some measure the bulb filament separation
-
Some concentrate on optimizing the angle measurement
-
How close should you be
-
Be careful about not rotating the cardboard mount
-
Make sure you are lined up to begin with
-
With the simplest materials, and with preparation, one obtains
the wavelength of light to around 15% .


